
Thursday, November 15, 2012
Quick progress pic. Been trying to spend a little bit of time each day before work trimming the frame of tabs and brackets I don't need or will be replacing. In this pic you can see I removed the top engine mount because the new tank that I want to use won't fit over the original mount. I will have to make custom brackets out of flat stock instead of the tubing design that was there. I also removed on of the neck gusset plates, the other will come off tomorrow. When I removed the engine mount I couldn't reach all the way in to grind down the welds, so the gussets will come off to clean that up and new gussets made from thicker steel will go in.

Monday, November 12, 2012

Sunday, November 11, 2012
Small update today. The frame is welded and waiting for me to get the flapper wheel onto the angle grinder and smooth out the heavier slag from the flux welding. I will say, very impressed with how it handled the job. I will put up pictures when its all ready, maybe Tuesday (day off).
Today I spent a little time before work brushing and buffing the front hub and rim. I'm going to go with a brushed raw metal finish on the wheels, tank, and rear fender with a matte clear coat over it for protection. Stainless spokes for the front wheel will arrive Wednesday and hopefully by the end of the week I will have the front wheel together. Still need to get the rear hub apart in order to replace the left wheel bearing.

Today I spent a little time before work brushing and buffing the front hub and rim. I'm going to go with a brushed raw metal finish on the wheels, tank, and rear fender with a matte clear coat over it for protection. Stainless spokes for the front wheel will arrive Wednesday and hopefully by the end of the week I will have the front wheel together. Still need to get the rear hub apart in order to replace the left wheel bearing.

Monday, November 5, 2012
Come to find out my new rear wheel I bought is for a different model - TX500. Good news is I can make it work, same axle size, same drum brake, same spoke size. Also seems to be an improvement because it has rubber spacers in the sprocket drive. The sprocket is different but the right one will fit on it with the correct hub spacing and sprocket spacing. Thanks to some help at xs650.com I know exactly what I need to do to make it work.
I don't think I'll be cutting up the extra sprocket like 5twins suggests. I think I'm going to see what I can find for actual spacers of the sizes I would need. Shouldn't be too hard....... shouldn't be! I'm also throwing the idea around to replacing the rubber drive dampers with some RTV urethane. Can't be any worse than the fixed drive of the hub I meant to buy that should be for this 650 model.
Will follow up with pics when I can get the thing cracked open. It's not cooperating with me right now, and hammering on the lock ring at 4am isn't very considerate...
Friday, November 2, 2012
Got up early today (11am) before work tonight to try and get some grinding done. There were some remnants of the frame pieces I just cut off that had to go, which went smoothly. Here's another test fit, looks pretty good to me.


Also got my rear wheel delivered today too. Got it on ebay for a great price. Included the assembled rear wheel with drum brake and also the extra rim which is very clean. Just needs a bit of cleaning and will be good as new. The brake drum needs to be hit with a wire wheel badly. Also have new stainless spokes in the mail for this wheel. Gotta get spokes for the front wheel and they will be complete, but I'm trying to sell my mag wheels first to keep the cash flow down since I jumped the gun on buying the hardtail last month.


Also got my rear wheel delivered today too. Got it on ebay for a great price. Included the assembled rear wheel with drum brake and also the extra rim which is very clean. Just needs a bit of cleaning and will be good as new. The brake drum needs to be hit with a wire wheel badly. Also have new stainless spokes in the mail for this wheel. Gotta get spokes for the front wheel and they will be complete, but I'm trying to sell my mag wheels first to keep the cash flow down since I jumped the gun on buying the hardtail last month.


Tuesday, October 30, 2012
Got the frame cut up today. Was pretty quick and easy with a sawzall. Test fit the new hard tail for giggles. Will now need to spend lots of time grinding down whats left of what I cut off, as well as brackets no longer needed.


Also took some time to keg my brews. First up was a Breakfast Stout which is incredible straight from the carboy. Second (in the back) was a Dortmunder Export, a hoppier, higher alc% light lager. The body is very light and watery, but oh well that's the way I made it. Didn't check the style guidelines which shows that it should have a medium body.

Monday, October 29, 2012
We got back from Disney on Saturday and had a great week. Now I have 2 days off to work on the bike before going back to work Tuesday!
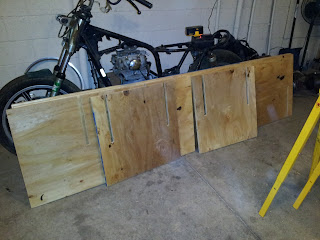
Yesterday I built a platform to mount the bike to make working on it super easy. When I was trying to get it started the first time it was awful sitting on the floor looking up and under trying to gap the points. Before I start, I did not come up with what I built, I wish I did - but no I did not. I got the idea online from the link below. Found it one day randomly searching motorcycle stuff.
http://www.bbcracing.com/old/box/
It started as two 3/4" 4'x8' sheets of plywood, and asked the guy at Lowes to rip em both down the middle lengthwise. Then one of those 2'x8' pieces were cut in half, then a half into halves giving me the following:
3 - 2'x8'
1 - 2'x4'
2 - 2'x2'
I then cut 3/4"x12" slots 3" from the ends of all sheets. 2 long sides got a slit almost in the middle; I lined it up to be center to the motor. Also won't be able to see it but the top piece has a strip of 3/4" on each end to keep it from sliding off.


I'm not going to talk about what it took to get the bike up there.... so lets just pretend that I just picked it up and placed it there.
Oh and to those curious about battery powered circular saws - I bought a Ryobi 18V combo kit from Home Depot not long ago to build the keezer (kegerator/freezer). I cut almost all 12 slits on 1 fully charged battery while also using that battery on the drill for the ends of all 12 slits. the battery died while cutting the 12th slit and finished it up with a freshly charged battery. (Cutting the oak I used on the keezer was a different story...)
Saturday, October 20, 2012


The hardtail was finally delivered on Thursday.

I spent most of the day off clearing out the garage getting ready for this project to go full steam. After it was ready I put on the new ignition points and the engine fired right up. I let the engine get hot, adjusted the idle screws and shut it down. I spent the rest of the night stripping down most of the bike starting with the birds nest of wiring inside the headlight bucket.

Then moved down to the chain guard and pulling out the old chain that was bound inside the side cover. Really needs to be cleaned in there. Battery box also came out.

Here's how the bike looked at the end of the night.


Wednesday, October 17, 2012
Here's the video I took this morning. It is idling pretty high because the choke is on, and at the end of the video I move to the other side of the bike, turn off the choke, and it dies shortly after. I guess it's not getting enough fuel with out the choke a.k.a. "starter" on. That opens a large fuel port on the engine side of the butterfly valve. The carb rebuild kit might help here with new jets or I just need to readjust the mix screw on each carb.

After that I took a few things off; sissy bar and rear blinkers, also had a foot rest/brush guard/I-don't-know-what on the front which I removed too. I was going to put the chain back on, but found out the last owner cut a link! I hope that if I can get that link out and the chain back together it isn't too short. I don't want to buy a new chain because when the rear hardtail goes on it is extended 4" - a new OEM length chain will be too short for that, and the extended chain I will need later would be too long to ride it now.

Oh - and still no hardtail yet.... thanks USPS.... ;)
Subscribe to:
Posts (Atom)